Behind the curtain on YouTube!
YouTube is a fantastic platform and one that most of us have used at one time or another. Some people call it YouTube University because it’s a great search engine for information. It’s also a great place to house your videos and make them accessible to people in different ways. Therefore, when one of my clients asked me how to upload their YouTube video and how to make it unlisted, I took the opportunity to create a quick tutorial video and thought it would share it with you too! By the way, our Blogs/Articles provide additional tips not shared in the video, and you won’t want to miss the HOT BONUS TIP at the end of this blog!
Let’s start from the beginning.
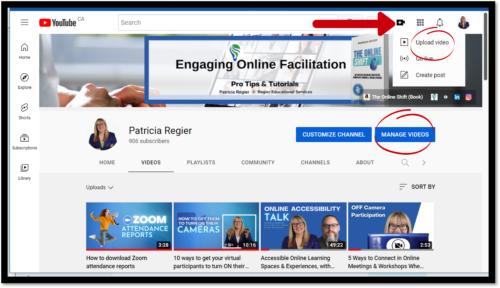
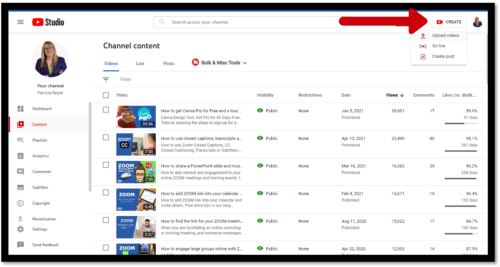
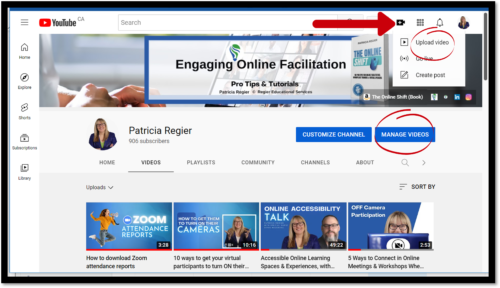
I thought we should start off with the basics in case you need a bit of direction on how to upload your YouTube video. First, you will open your YouTube account and click on your icon in the upper right-hand corner. This will produce a dropdown menu that includes Your Channel. Choosing Your Channel, will take you to your home page and then you can click on the Create icon at the top of the page that looks like a video camera. The Create icon will then have a dropdown menu and you will choose Upload Video. Then the screen will open that allows you to select your video file to upload. You can either choose a file from your computer or if you have the video file open on your computer, you can drag and drop the file from there.
Give it a title and some descriptive text.
As the file is uploading, the title location appears which you can fill in. I have an automatic option set up on my channel, which I change with each upload. Select a title that your audience is searching for or what your client will recognize. Under the title is a space for you to add some text that will explain to the viewer what the video is all about. There is space here for up to 5000 characters, so feel free to get a little wordy if you want or need to. You can also add additional links, such as an article or blog post on your website.
Next…
We’re going to click through the next couple of screens (those are tutorials for another day or you can learn more on my go-to YouTube channel with tutorials about Youtube, and my YouTube Coach). Now, let’s get to the purpose for today’s tutorial.
Visibility…
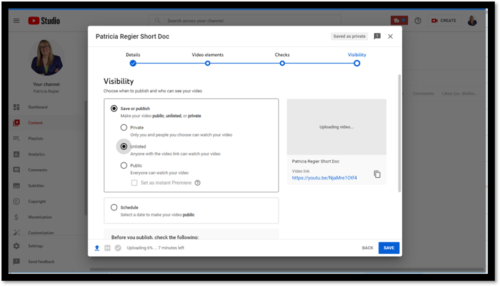
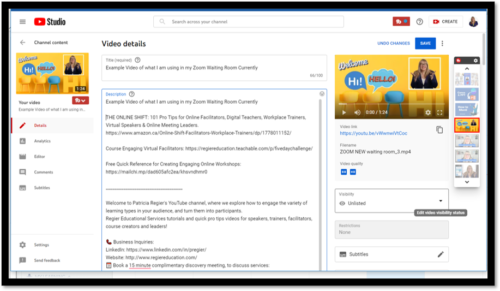
This is where we can decide who we want to view our video and how it will be published. You will see here that you can save or publish your video. Then you can make it Private so that only people you choose can see the video. Unlisted will make it so that anyone with the link has access to watch. Or you can make it Public right out of the gate, and anyone can watch.
We’re going with Unlisted.
We have chosen Unlisted so that we can send the link to a specific group and the video WON’T be visible on our channel for everyone to watch. Even while the video is still processing, you can copy the link and paste it into your email, ready to send out to the people that the video was intended for. Please keep in mind that they won’t be able to view the video until it has finished processing, so you will want to be sure that has been completed before sending out your email.
Reasons why to have your YouTube video unlisted:
- Quick videos intended for a particular group (welcome videos before a workshop, or a quick tutorial)
- Exclusive bonus content for a group, such as a learning booster message after a workshop
- YouTube is a great place to store or host videos for courses and other purposes
- I also make my videos unlisted so that my Virtual Assistant can watch them and get these blogs started (Thank you!).
- I also have my videos unlisted while I finish all the behind-the-scenes steps on YouTube (description, tags, cards etc.)
Please keep in mind.
- Keep in mind that anyone with the link can watch the video.
- If you change the video back to private, anywhere with the link embedded, won’t play the video.
- Even with unlisted videos, I encourage you to take the time to add an end screen, description, and say “please subscribe” etc. while creating your video, if appropriate.
Look under manage videos.
You will see the finished product under Manage Videos, and it will show you the visibility, restrictions that you have put on the video, the date it was published, how many views it has had and the number of comments that people have made.
And that’s it…you’re done! You have successfully uploaded your YouTube video as unlisted.
 Hot Bonus Tip:
Unlisted means that anyone with the link can watch the video. Therefore, if people share the link, you may have more views than what you intended. Hot Bonus Pro Tip is to give your group a limited amount of time that they can watch the video, and then after that time frame has passed, you can make the video private. You can also write this date in the description, and mention to not share the exclusive link or content with others. Or maybe you do want people to share this exclusive link with others, and that’s OK too.
Video Tutorial: How to Create Your YouTube Video as Unlisted
In case you missed it, here’s the previous blog post: How to Download a Zoom Attendance Report
Author
Patricia Regier, MEd is the Online Expert who’s built a career on the belief that training and online learning doesn’t have to be boring. As Owner of Regier Educational Services and with a Master of Adult Education, Patricia is known for making her audience feel empowered, engaged, courageous and confident. Her debut book and keynote, The Online Shift teaches newcomers to the online space and seasoned professionals alike how to optimize their online presence and maximize engagement. She’s tried, tested and refined using the latest behavioral science, research and psychology to make sure your next online experience is a hit!
Complimentary 15 Minute Meeting
To book Patricia as a speaker or consultant:
Please use the button above or email patricia@regiereducation.com
Regular Quick Tips & Full Tutorials
- Sign-up for Facilitator Tips & Resources email member news
- Subscribe to our YouTube channel!
- Follow on Twitter & Instagram
- Like us on Facebook
- Pin this on Pinterest
- Share on LinkedIn
- Listen as a Podcast
- Take the Learning Quiz
- Register for our Course
- Additional resources

